

The Clay Up Process!
First off, let’s get some key terms down:
Sculpt: The original sculpture (That I spent 14+ fucking hours working on)
Mold: framework or shape used to make an object of complementary shape from a pliable material: http://en.wikipedia.org/wiki/Mold_(manufacturing)
Molding Material: The material the mold is made out of, in this case it will be Hydrocal (more to come on that)
Cast: The final product; what I will have after the mold is created and I’ve poured the casting material into the mold as a liquid and allow to solidify (more on this later), it will have the exact shape of the sculpt.
Casting Material: What the final puppet (at least the portion that comes from the mold; you’ll notice the head is not being molded) is going to be made out of.
Releasing agent: Something put on to the sculpt (or anything) with the purpose of making the de-molding process easier, so that when the molding material has hardened it will be easier to take the sculpt out.
MOTL: More On That Later
Key: Part of the mold made to register the two sides of a two part mold.
Okay.
Yay! This takes a long time and it’s very precise work. I am now preparing the puppet for the molding process. I need to start thinking about what type of mold I’m making.
For a puppet like this it makes the most sense to do a two part mold. This means that I’ll have a mold of one half and a mold of the other half that fit perfectly together (cut vertically along the body, back side and front side.)
In order to do that I need to “clay up” the sculpt, but there are a few things I need to do before that.
You’ll notice a shine to the sculpt. After I’m completely happy with the sculpt, I have to spray it with crystal clear. Crystal clear is like a clear spray paint, it’s original intent is for making something either glossy or matte. We use crystal clear as a releasing agent. This, again, is so that after I pour the mold (both sides) it will be easier to take the sculpt out and I wont have to spend as much time cleaning the mold, it will just come right out (more on that later, abbreviated MOTL.)
The other reason I spray the sculpt with crystal clear is so that I can draw the half way line. I draw a line along the edge, between the front and back of the body, with a sharpie. (Obviously, make sure to wait until the crystal clear has dried, like 5 minutes.)
The next thing I need is some foam core (coreboard.) On it I draw a rough line around the sculpt. I didn’t trace the sculpture, I drew the line for where the mold is going to be. You can see the line in the picture labeled “Rough line around sculpt can be seen”
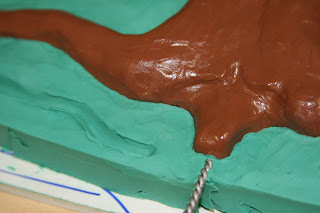
Now we can start the clay up process! I started by elevate the body and holding the limbs up with a few balls of clay. After that I roughly, but very carefully put clay down up to the half line. The clay I’m using for the clay up process is the same type of clay, Klean Clay. I chose to use a very different color so that I could tell what’s sculpt and what isn’t (MOTL.) I would have liked to use a different harder type of clay for the sculpt and clay up with klean clay, but for various reasons I used klean clay for the sculpt and the clay up. I forget the name of the clay I would like to use for the sculpt, I’ll get back with that.
To begin I roughly put clay up to the edges. Things to keep in mind:
1) Make sure the whole clay up is level with the half line, don’t approach the sculpt then curve up or down to it.
2) Try not to touch the sculpt much, especially with your tools. Don’t wanna fuck it up do ya, ya twad!
3) At this point it’s important not to clay it up too precisely. Look at pictures that say rough clay up, that’s how you want it.
Once I had it to the point in the pictures before the picture labeled “rough clay up done” I made the key. The key is that squiggly line around the sculpt. I simply used a sculpting tool and made it squiggly very intentionally. Make sure to level out the top edge of all of the clay up clay, it should be smooth (the bottom edge, the edge touching the foam core, doesn’t need to be smooth at all, in fact it wont be. MOTL)
After that, make the edges very clean. By edges, I mean the edges next to the sculpt. The edges of the clay up clay a should go right up to the sculpt. This will require a tool of some kind. I used a rubber sculpting tool and a toothpick that was cut to have a hard, flat edge. I made sure not to scrape the sculpt. I did the fine tuning last because any sort of smoothing that’s being done on a another part of the sculpture can pull and affect the clean edges.
No comments:
Post a Comment