Sunday, December 6, 2009

Props!

So, it's been a very long time since I've posted. When I created the blog I thought that maybe I'd post the whole way through, about how I animated and everything. But that seemed weird for some reason. I don't know what to say about actually animating other than techniques that one would learn in any animation class; slow in, slow out, arcs, expression, all dat.

So here are some props I've made. I'm really happy with the tombstone, it's cool. I'm very nearly done, after today I'll only have 3 shots left to animate. I need to build quite a bit for them still, but that's totally awesome!

Television set. Made from posterboard, balsa wood, paint, christmas lights, 9volt, paper clips

Gravestone made from balsa wood, gray wash paint

This is for a close up shot of my head, the brain looked cooler before it was all mushed together.
It's a fucking pillow. What do you want?!?

As, I've told some people, I'm shooting the film in my apartment. That's my bed underneath my table. I have the push it up against the wall when I want to animate. I like it because it'll be a great thing to reminisce about when I'm older.

So, I can do a post about the actual animation, it'll be a while though. Would anyone be interested in that? (Really, I'm just curious to see if anyone I don't know has actually read this, that'd be cool.)

Wednesday, November 18, 2009

My Vimeo Page

I realized I never posted my vimeo page. Watch some if ya feel like it. My reel is a bit out of date.

http://vimeo.com/user1702698

Bakshi Interview

Cartoon Brew already linked this but everything Ralph Bakshi has to say is great. I've yet to not be inspired by things he has to say.
http://fullecirclestuff.blogspot.com/2009/11/conversation-with-ralph-bakshi.html

Wednesday, November 11, 2009

Molding Materials pt 2

The other day I helped my friend make a bunch of body parts for her film. Rob Benevides showed us all how to do this. Here's a short list of materials:

Royal Jel-E – Silicone releasing agent, used for casting silicone in a silicone mold. Brush on and then dry with a hair dryer. It's water soluble, which is good because it washes off the cast easier so you can paint it.
Body Double- Silicone molding material. Mix two parts by volume. Paint on skin layer then glob on. We used it for body parts.
Plaster Bandages- After putting on the body double, put plaster bandages on after the silicone or whatever mold making material. This makes a hard shell for the mold.
Platsil Gel – 10 – Silicone casting material- flesh like casting material. Two part mixture by volume. To pigment, put pigment in one half, then mix second half to pigmented half.
Tincure Green Soap- releasing agent for plaster bandages. This is for doing a two part plaster bandage shell.
Flocking- pulverized felt for use in pigmentation of silicone
Alja- safe- algenate used for one time molding. Put a plaster bandage shell for support. Mix powder with water.
Dental Algenate- mouth safe algenate. We used this to try to make a mold of my tounge. A few things didn't work so we sculpted and molding a sculpted tongue.

Tuesday, November 10, 2009

Why don't you come on back to the war? or CG vs Hand drawn, what the fuck happened to stop mo?

I, like many animators, am a daily subscriber to Cartoon Brew. For the most part, I agree with them and their opinions on films and animation. Today they posted a video by animator Gene Deitch for the Xiamen International Animation Festival.


You should definitely watch it. There are a lot of things that he says that I agree with. But, as I'm finding with pretty much everything, I'm very conflicted.

Deitch practically calls a war on CG animated films. (I use the term CG out of respect for Deitch's 2D/3D complaint, which is essentially correct.) He call for a return to hand drawn animation. And he's by no means the only one.

I am constantly finding that in the animation community, in fact the art community as a whole, there is a hatred for CG and the CG look. It's not organic, not artistic, and not quality. It's not like hand drawn where we aren't bound by technology.

I completely disagree with this; but here's the annoying thing: I'm one of them. I don't like the CG look. It's not because it's not organic, or it's not artistic. I believe that CG animation is incredibly artistic. When one of my hero's, Don Hertzfeldt was asked about CG animation he gracefully said that he feels CG artists often get a bum rap because "people seem to think that computers have a 'make art' button." It's not until you attempt it that you realize the mind that makes "good" CG animation is a brilliant mind both intelligently and creatively. I use the term "good" because face it; there's shit in all forms of animation, even hand drawn.

People also hate the flash and computer inked look of animated films. Here I am in complete disagreement as well. Flash is a tool that helps animator animate easily. It's so easy to create a crappy looking film with flash, and many do. This does not mean that flash is not a viable program for beautiful animation. The flash animator simply needs to realize that animation will always take a fuck-ton of work. Tweening and key pathing can still be tools used to create beautiful animation, but one cannot forget their basic timing rules. Because these animation friendly tools that exist to make animation quicker exist, people so often choose the easy way out and use them without thinking of how long an action still takes.

I've seen this from really good hand drawn animators. I'm still a student and in a class we made a digital puppet in after effects, which we were supposed to animate using hold key frames and linear key frames. When we watched the students' work some of the best animators in my class had jumpy or "dreamy" (linear) movement in their animation. I know these people can animate stunningly well, but when given the lazy, easy way they take it. Sure, they probably just didn't want to spend the amount of time needed to animate well, but who does when you can animate it sub-par. And these are talented animators who can get shit done; you must have a good work ethic to be an animator. (Not necessarily true, yes I very much realize this.)

I think it's because of these easy ways out that these computer based art forms are looked down upon by so much of the animation community. Like every art form, they have a majority of crap and a minority of golden beautiful work. It's the crap animation that gives these computer based animation medium a bum rap. But we gotta realize that hand drawn animation is about as full of crappy animation as computer animation. Let's not forget some of the crappiest animated Hanna-Barbera and Japanese traditional animations. It's simply that today that crappy animation that would be done hand drawn is done on a computer because it's cheaper and easier. It's as if the computer animation has absorbed the hand drawn crap, therefore adding to its bum rap.

Amid Amidi recently wrote a post about Jonathan Demme planning to make an animation feature from the book Zeitoun. In it Amidi wrote a cautionary note telling Demme that traditional hand drawn animation is the only way to make this film. "I beg you not to use cheap Flash/AfterEffects-style animation. Don’t Waltz with Bashir this film, and compromise the personal impact of the story with mechanical movement." I liked the visual style of Waltz with Bashir. It looked beautiful and it was different, finally. I think it's pretty extreme for any artist to make such a bold claim that there is only one way to animate this film successfully.

Now, it's time for me to once again take a step back. Everything I have said here is what I believe. I fully believe that flash animation, even with its tweening and motion path tools (used with discretion and most importantly thought) can create beautiful animation that rivals any hand drawn animation. I also believe that CG animation can, and certainly has proven it, create beautiful animation that rivals any Disney hand drawn animation. But, I still don't like it. I don't like the look of Pixar. I prefer the look of Plympton, Hertzfeldt, and Bakshi to Pixar any day. I agree that Pixar is amazing visually (and can be really good with story, but that's something completely different from what I am writing about.) I just don't like it. It's too smooth, too pretty, and not gritty enough. And this isn't by technological set back; it's an artistic decision. The same is true of flash animation, for the same reason. Often too smooth, not gritty enough. Much like a scientist, I joyously wait to be proven wrong.

But, in the end, none of this matters. All of these visual styles are a means to an end: storytelling. In the end for me, the only thing that matters is the story. I love South Park, Hertzfeldt, Aquateen Hunger Force, Bakshi. None considered greats of animation, but they know the story and have made truly great films. The counter-example to these is Final Fantasy: The Spirits Within. No one has ever called this a great movie, but the animation was beautiful. The story sucked. In the end, I don't give a shit what it looked like.

To finalize, I'd like to be a picky asshole. Deitch says in his speech that drawing is traditionally the basic origin of animation. What the fuck happened to stop motion? Need I remind the world The Adventures of Prince Achmed? I joke, but seriously, where does Stop Motion fit in this war? I actually know the stop motion position, we apparently hate CG. Working in stop motion, we're always up against CG for jobs. So, I guess I now have to hate CG. Damn, I really wanted to stick to my principles on this..... Eh. Death to all computers!

I welcome any and all comments from the family of loved ones that died while actually reading this post.

Monday, November 9, 2009

Puppet Casting

Paycheck gettin fun!
Okay, this was by far the most difficult part. I actually had to cast my puppet three times. I'm not going to bother with explaining how I fucked up. Here's a shopping list:
1) L-200 Casting Latex
2) acrylic paint
3) Flex Foam Foam It 3 (flex foam)
4) Klean Clay

First thing to do is to mix up some paint with the latex. Start by mixing up your color for skin tone. Make sure to have plenty, you'll need it for many things. Mix the paint with the latex. It should be a mixture of about 60 to 70% latex and 40 to 30% paint. More latex than paint. If it is equal then there is a chance that the latex will crack as it is bent too often.

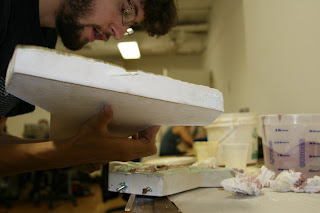
Next paint the mold. Don't let it dry completely between coats. Put on about 5 coats. You can check the thickness by carefully lifting up an edge. I didn't paint the shoes for a few reasons. One, I want them to be completely latex. This is mainly because I imagined it'd be easier to fill it than paint it. I don't really know why I thought that. It'd probably be fine to do it the same way, just paint a skin. I used latex that isn't mixed with paint for the shoes and I plan on painting them later.


So, you've finished painting. The top layer should not be hardened yet. Put the armature in and attach the feet to the bolts. We want the final puppet to have a foam center so that it isn't too stiff. If the body is completely latex, then the body will be very stiff and un-poseable. This is what we use the foam-it for.

First: Here's how I did it for my final version. If I had another chance I would tweek it a little, so later I'll explain how I would do it.
Before we mix the foam it, there are some things to do to prepare. First, put some vaseline on all exposed parts of the mold. (you don't need to put it on the outside walls) Second, get rolls of clay ready. I like to put it on the edges of the mold so nothing can seep out. Get a board ready. When you pour the foam it, it's going to want to expand the mold, seperating the two parts. You're going to stand on it for about 10 minutes. Fourth, have a friend ready to help, once you've mixed it's a quick process, you have to move fast. Fifth, have paper down on the floor to put the mold on while you're standing on it. It can and will seep out and will stick to everything.
I filled the feet with latex (after inserting the armature. This didn't work completely and it's on of the things I would change if I did it again. I'll explain later.
Now, get some measuring cups or make some. Mix according to the directions on the foam it. It's a two to one ration b to a (if memory serves.) Mix vigorously for 20 seconds then pour quickly. Pour at the lowest part of the mold and make sure to get it in the arms and legs. Put the other half on quickly and put clay quickly on the edges. Does not have to be neat at all. In fact, if I did this again, I wouldn't do the clay.
Put the mold down on the floor on the paper and put th e board on top and stand on it for at least 10 minutes. After that set it aside and wait. I demolded the next day, this isn't necessary but I did.


Okay, here's how I would do it the second time. I would have both sides painted, with the top layer still wet. I would paint the feet, and maybe pour some latex in (with the armature in place.) Still put vaseline on the edges. Now I would put the two parts together and let the latex dry, overnight probably. If I could, I would turn the mold over every 10 minutes or so while it's drying. Once it's done drying I would pour in the foam it into the pour spout at the neck (make sure it's large enough.) This would hopefully ensure a better seal. It probably has it's problems though.
They now apparently have a foam it 8 that has a skin to it, so next time I'd probably just use that actually. And I'd make a silicone mold. The things you can do...


Wednesday, November 4, 2009

Picture Post!

Howdy Ya'll,

Here's a fun post with pictures. These are all things made in the NYU class "Special Effects Make-up" with Rob Benevides. It's a great class, really great. If you're an nyu student and this interests you at all, take it.


Creating an Armature

fun!
Okay, creating an armature. First, here's the shopping list:

Armature Wire (1/16'')
Annealed Steel Wire (I used a gauge of 24)- finger armatures
K+S Tubing (3/16'' diameter)
Nuts, bolts, wing nuts (on of each per foot, all of same size. Mine say XS6-32x2.)
Propoxy20 or Epoxy Putty
5 Minute Epoxy
Vaseline
A table with holes in it (holes bigger than the bolt, but smaller than the nut)
Pliers, wire cutter
Hand Drill


The first thing to do is to twist the wire. Do this by folding a strand in half and then tightening one end into the drill and have a friend hold the other end with a pair of pliers. Twist the wire together until it looks like it does in the pictures. The reason for this is so that the strength of the wire is doubled. The reason you do this over simply using 1/8'' wire is so that if one fails the other will still be there.


Now, cut your wire so that you have one that will be the spine. This should be much longer than the actual spine. It should go from just past the butt to a good inch above the head for safekeeping. Use your mold/ drawing of puppet for measurements.

Next, use one piece for the legs,
by bending them with the top bend looking like this:


(See instructions for tie downs by scrolling down in this post)

Make sure to leave much more room in the feet than needed. Fold the extra wire on the butt end around the legs.

Now get out your propoxy or epoxy putty. These come as a two part putty, in a tube shape, with a light color for the inside and a dark color on the outside. Cut the epoxy (not the long way) and knead it together until the putty is all one color. There should be no marbling. Once the putty is kneaded you have about 5 minutes of working time. Use the putty to put the legs and spine together. Make sure to work it into the cracks and holes of the armature. Another very important thing is to make sure the armature sticks out of the sides of the putty, not out of the corner. If it sticks out of the corner, it creates a very fine point for bending that weakens the wire faster.


Now we create the wire for the arms. Remember, you should be using the mold to scale everything. Leave the wire a little bit long on the hands, you can always cut it. Where the arm wire crosses the spine wire, put a dip in the wire.

Create an opening in the spine by using two pliers, twisting the wire loose.

Put the arms wire throug
h the hole and once again apply propoxy or plumbers epoxy in the same manner as the legs. This time make sure it sticks out the top of the epoxy, not the corners or side.


Now we create the hands. The easy thing about computer 3d work is that once you create one hand, you simply mirror it to create the other. But nooooo, this is stop motion. I used the annealed steel wire for the hands, it's supposed to last longer. I twisted it as well and made sure they fit into the hand mold. Create a palm with propoxy (or, as always, plumbers). Do not attach them yet to the armature.

(not attached, I have a temporary 5 minute epoxy dab holding it)


We need to now make bones. These are created by the K+S tubing. Make sure to leave plenty of room for the joints, more is better than less. Marking where you'll put the bones on the wire with a sharpie aint a bad idea.


Mix up some 5 minute epoxy, glob it on the wire where the bones go, and put the bones on. Once again, make sure this matches up with your mold.

Now we can attach the hands. Cut the wire accordingly and attach the hands with some propoxy. Try not to make the wrists too bulky, though.

Now we need to put in the tie downs. This was a check and guess process to match up with the hole that exists in the mold. First thing, we need a table with holes in it. The hole should be larger than the bolt, but smaller than the nut's diameter. With the wing nut on the bolt, down an inch or so, (with the "wings" of the wing nut facing the head of the bolt) dip the first half inch or so of the bolt into vaseline. This is our releasing agent, it will ensure that the epoxy doesn't stick to the bolt. We don't need too much vaseline for this.
Put the bolt through the bottom of the table (so that the wing nut is below the table.) With it sticking out, attach the nut to the bolt, just so that the bolt doesn't stick out of the nut, but the nut should securely be on the bolt.
Wrap the extra wire for the foot around the bolt (leave the extra wire in case you've placed the hole wrong.)


Wrap the wire tight, then take the bolt out. Take it to your mold and check to see that the hole, where the nut will sit above, matches with the hole in the mold left for the nut. Now get it right.
Bring the armature back to the table and wrap it around the bolt again. Attach the nut. With it secure around the bolt, tighten the wing nut tight. Mix up some 5 minute epoxy and apply it to the bolt generously. Don't let too much get on the table. It's not a bad idea to put some vaseline on the table before attaching the wire and nut and bolt (once again, not too much, it just gets messy.) After hardening, cover it again with a medium/thin layer of propoxy. Once that has hardened remove the bolt. You now have a tie down. Do the same thing with the other foot.
Make sure the foot fits in the mold, if you have to shave some off, that's fine.


I'm pretty sure you now have an armature. Don't worry about the head.

IMPORTANT NOTE: On the off, off chance that someone is creating this along with reading this blog, you need to reinforce the ankles. I've already started animation and I found the ankles to be too weak. I would use some 8th inch wire in addition to the doubled 16th inch wire. Make sure it is is connected securely to the foot and the lower leg "bone" Twist it with the wire.
Also, I reinforced the spine by adding an 8th inch wire as well.